Operator panel
User Guide
Login in
Open your browser and enter the web address for the panel in the location input. That address depends on your particular setup, it could be something like:
https://pbx.business-isp.nl/fop2
If everything is in place and fop2 server is running, you will be presented with the login box.
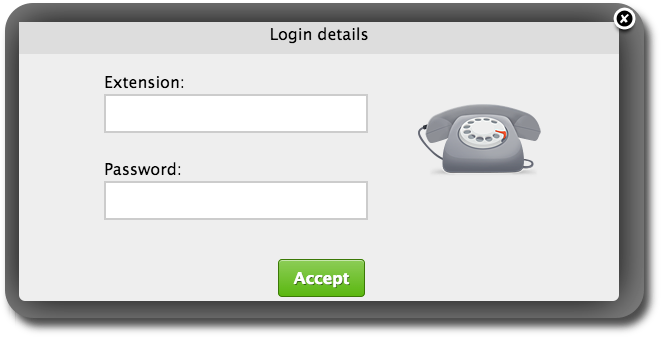
Use your extension and password as defined in /usr/local/fop2/fop2.cfg to login. If you use the standard FreePBX install, you will login with your Extension Number and Voicemail Password. In order to perform actions with the panel is mandatory to login with some extension, as that extension will be the originator of the actions you perform.
Passing credentials via URL
Since version 2.10 it is possible to pass the extension and password in the URL to avoid being prompted to login. You can use this feature to embed the panel into your own application or authentication system. In order to do it you have to append the exten and pass parameters, like:
http://pbx.business-isp.nl/fop2/?exten=100&pass=9999In a multi tenant system where you use panel context you need to pass the context too:
http://pbx.business-isp.nl/fop2/?exten=100&pass=9999&context=tenantAMain Panel View
After successful login, you will be presented with the panel window
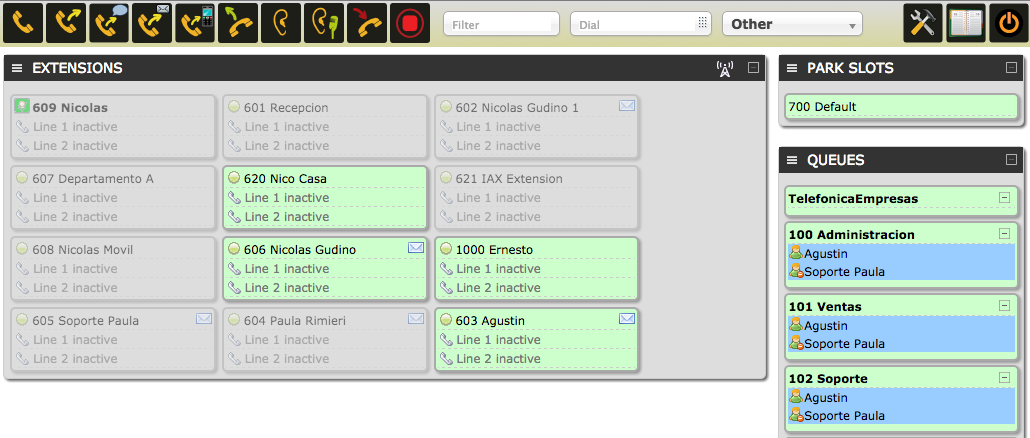
There is a toolbar that is always visible at the top, and four sections in the content area: one for each kind of button.
The button corresponding to your extension (the one you used to login), is always at the top left of the Extension section, with the label in bold.
Each section has a title bar with a minus/plus sign icon at the right. Clicking on the button will collapse or expand the section from view. The collapse state is remembered across sessions. Suppose that you are not interested in trunks, you can collapse the section and it will remain minimized until you click the plus sign again.
It is also possible to move panels up or down by dragging the sections with your mouse. The layout is also persistent and individual to each user.
Anatomy of the toolbar
![]()
At the top of the panel there is a toolbar. From here you will perform most of the actions that can be done with FOP2. There are some distinctive sections as follows:
The action bar
The action bar consist of a row of buttons that represent actions to be taken to active calls. Depending on the permissions the user has the buttons will be displayed or not. For this actions to work, you need to first select the destination or target button with a click of the mouse. When you do that, the target button will turn its borders to blue.
After selecting a target extension, you can perform your command by clicking the appropriate button. The possible actions are:
Required permission: dial
When clicked it will originate a call to the button previously selected on the extension list. Your phone will ring and when you pickup it will dial the destination extension.
Required permission: transfer
When clicked it will initiate a call transfer to the button previously selected on the extension list
Required permission: transfer
When clicked it will initiate a supervised call transfer to the button previously selected on the extension list, or the number typed in the dial box if any.
Required permission: transferexternal
When clicked it will initiate a transfer to the external number defined in the button configuration.
Required permission: transfer
When clicked it will initiate a transfer to the voicemail extension as defined in the dialplan and configured in the button config file with the voicemailext parameter.
Required permission: pickup
When clicked it will pickup the ringing channel on the previously selected button.
Required permission: spy
When clicked it will start a call spying session. It will first ring your phone and when you pickup it will start spying on the previously selected button.
Required permission: spy
When clicked it will start a call spying session with whisper enabled. It will first ring your phone and when you pickup it will start spying on the previously selected button. You can then talk to the target extension without the other party hearing you.
Required permission: hangup
When clicked it will hangup the 1st active call on the target button
Required permission: record
When clicked it will initiate or stop recording on the target button. A call that is being recorded will be signaled with a cassette icon.
Note
In order for the toolbar to show up, you must log into FOP2 with an extension that is also listed in the main Extensions view. If your extension is not visible, then the action buttons won't show up at all, because FOP2 won't be able to determine under which extension to perform actions.
The filter box
![]()
What you type in this input box will filter out any button who's label does not match what you type there. If you have a panel with a hundred buttons and you want to see the state for "Bob", just type it in the input box and the display will filter out all buttons except for the ones that contains Bob in its label.
It will also filter by Tag, provided you have configured any tags for buttons, so you can quickly filter by department or whatever tag might come useful in your situation.
The dial box
![]()
This input box is powerful and has multiple outcomes. So using just this UI element you can perform several searches:
Dial to a phone number: When your phone is idle, just type the number and press ENTER, your phone will ring and it will originate a call to that number when picked up.
Transfer to any number : When you are in an active call you can type a number, either an extension or an external number and press ENTER to start a transfer of your current call to that number.
Invite any number to a Conference : If you select a conference button and then type a number in the dial box and hit enter, FOP2 will originate a call to the number typed and it will place that call inside the conference selected.
Direct VOIP dial: You can type a sip address with this format: SIP/$(exten)@$(domain) and it will originate a direct sip call to that extension @ server.
Skype calls : You can type a skype address with this format: skype/$(name) and it will originate a direct skype call to that user providing you have Skype for Asterisk installed and working.
Phonebook search: Anything you type here will be searched in the visual phonebook as you type, and results will appear as a selection list at the bottom of the box. You can use the arrow keys to select the proper result, and ENTER to originate the call.
.tel domain look up: If you type a .tel domain, the system will lookup via DNS the domain and give your the results if it finds any. You can get voice numbers, direct voip dial and web sites. If you select a result and press enter it will originate a call to the phone number, direct voip call or open the web page in a new window.
Presence select box

Here you can set your presence information, as configured in the presence.js file. The information is immediately stored in Asterisk database and presented to other panel users in real time.
When using FreePBX and FOP2 version 2.10 or higher (with the extensions_override_fop2.conf file added to your /etc/asterisk directory via the generate_override_context.pl script), setting or unsetting your extension to DND from your phone by dialing its feature code (78/79) will also be reflected as "Do not Disturb" in this select box. On the other hand, if you want the FOP2 presence to put your extension in DND, you will have to install the FOP2 Presence DND plugin from the FOP2 Manager if using FOP 2.27 or higher.
Note
Since FOP 2.27 it is also possible to change the behavior of changing presence so it sets a queue member on Pause with reason by using the Presence Pause plugin, available for installation via the FOP2 Manager.
If you do not use FreePBX it is possible to have that kind of integration but it requires custom coding and dialplan settings. Otherwise, the presence state will not affect the dial behavior, it will just tell other FOP2 users about your current availability.
Your button will reflect your state with a little presence icon, if you mouse over the presence icon of any extension you will see a tooltip with the textual state (besides the color).
The last option in the select box, named "other", lets you specify any text for your presence state if the predefined ones are not good enough for you.
Extension Buttons
Extension buttons show lots of information packed in a small rectangle. There are two colors for the button, green when the extension is not engaged in a call, or red when it is. When the phone is ringing, it will remain green, but the line icon will indicate the ringing state. Since version 2.1 there is a third (yellowish) color for when you have User&Device mode enabled in FreePBX and the device is in adhoc mode. This ia a sample button that is ringing:
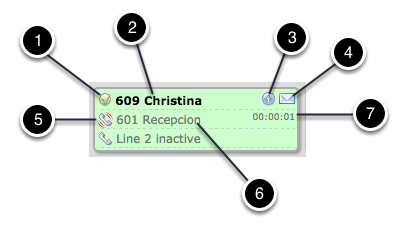
There are several elements:
- 1 Presence Icon
- This icon indicates the presence state for the extension. A green circle means the extension is not in a call. A red circle indicates that the extension is busy or in a call. A little card icon indicates a special presence that was set by the user. The color for the custom presence is configurable. If you mouse over the icon a tooltip with the custom presence text will appear, that text is also configurable via the presence.js file. Lastly, if someone initiated a call recording from within FOP2, a tape icon indicates the call is being recorded. Since version 2.10, clicking on this icon will display an action menu. If you have the proper permissions you will be able to add, remove or pause the member from a queue, or send an email to that user if the email setting is defined in the button configuration. You might also see other options in this submenu that can be added via plugins, like setting call forward, etc.
- 2 Button Label
- This is the text label for the extension. It shows the extension number first followed by the text label that was configured in the button definition inside the button config file.
- 3 Information Icon
- This icon will show if the extension is paused showing a clock (for queue members). If the extension is engaged in a call that came from a queue, it will display an info icon that will show the queue from where the call came from when you mouse over it.
- 4 Voicemail Icon
- If there is voicemail waiting or stored for the extension, it will appear an envelope. The number of messages can be read in the tooltip when you mouse over it.
- 5 Line activity icon
- The handset icon will indicate if the line is ringing, it is engaged in an outgoing call (right arrow), and incoming call (left arrow), or held (hourglass)
- 6 Line callerid
- If available, it will show callerid name and number.
- 7 Line timer
- The timer for the current call.
Queue Buttons
Queue buttons have some particularities. Besides the queue name, they will show the list of members or agents for that queue, with a little icon representing the member state, and also the list of calls waiting on the queue with their call counter and timer, as depicted below:
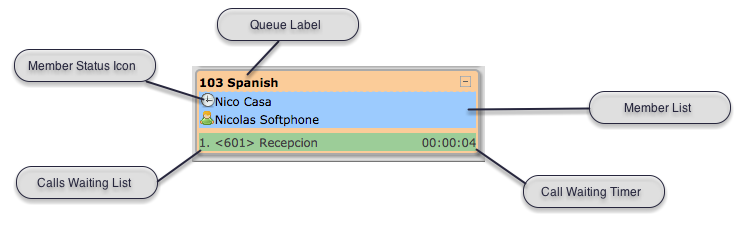
They also can be used to filter out extension buttons. When a queue button is selected, only the extensions that are part of the queue will be displayed. This is particularly useful for call center managers, as you can focus on a particular queue activity, removing the 'noise' from other queues/extensions.
The state icon for the queue members might be:
![]() = ready
= ready
![]() = busy
= busy
![]() = unavailable / invalid
= unavailable / invalid
![]() = paused.
= paused.
FOP2 will also monitor agent or device names, and rename extension buttons accordingly.
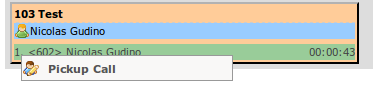
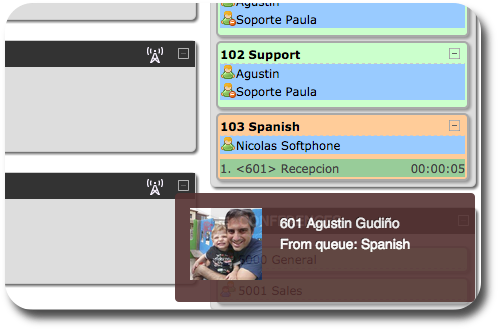
Picking up queued calls
From FOP version 2.10 you can click on a call waiting on the queue to display the pickup submenu. If your extension is allowed to pickup calls you can click on the action and the waiting call will be redirected directly to your extension:
Trunk Buttons
Trunk buttons are the simplest, as they only will show the number of channels active for that particular trunk.
Since version 2.10, trunks also display detailed information about bridged calls, with channel name and callerid. It is important to note that bridged channels are the ones that are linked to another channel. Calls that are not answered or inside an application, like an IVR, Voice Mail, etc, will not show up.
Clicking on the channel name will bring an action submenu with the option to pick the call up. Clicking it will redirect the call to the logged in extension, in the same way that Queue or Pickup line details.
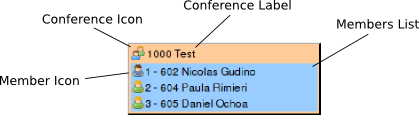
Conference Buttons
Conference buttons will show every participant of the conference. They also include special actions to be performed on the conference itself or to a particular participant.
There is a little icon to the left of the conference label, when clicked you will be presented with a special action menu that will let you lock or unlock a conferences, or mute/unmute every participant in the conference
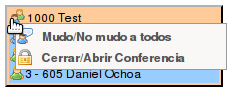
To the left of every participant there is also a member icon, it will be a green user for regular participants, or a blue suited user when that participant is admin or the marked user. Clicking on the icon will open up the action menu for that participant, where you can toggle mute for the user or kick it out from the conference
For the conference actions to work, the extension you are logged as needs the meetme permissions defined in /usr/local/fop2/fop2.cfg as explained here.
Park Buttons
The Parking Lot buttons will show parked calls and their respective slots. It is possible to pickup parked calls by clicking on the call and selecting the pickup action submenu.
How to Park calls
To park your active call, you have to select the Park button and then click the Transfer action button in the toolbar.
Performing Actions
Whole buttons can be clicked to select or deselect them. When selected, the border will turn blue. Once the button is selected it will become the target button for your action.
Every button in the toolbar requires a destination button to be selected. Clicking an action button with no extension selected won't trigger any results. Some actions will work only on the active line for that extension. For example, if an extension has two calls, and one of them is held, if you click the record button it will start recording only the active line (not the held one). The same happens with the hangup or transfer buttons: if you have two calls on your phone and one is held, clicking the transfer button will redirect your active call, and not the held call.
To transfer a call, when talking to someone click on the target extension, it will be highlighted blue, and then click the transfer button in the toolbar.
To record a conversation to disk, click on the extension button you want to monitor and then click the record button in the toolbar.
Action submenu
Since FOP2 version 2.10 the presence icon for buttons of any type can be clicked to perform extra actions. When single clicking the icon a popup menu will show up listing the allowed actions for that particular button. This way you can add, remove or pause members from a queue, email users or pickup parked, queued or trunk calls.
Extension actions:
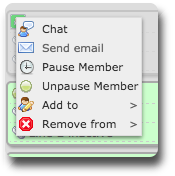
For extensions you can select to send emails to them (if the email setting is defined in the button configurations), you can initiate chat (if your FOP2 license includes Chat support and you have the chat permission set), you can pause or unpause the queue member, or you can add or remove the extension from any available queue (providing you have either the queueagent permission to work on your own extension, or the queuemanager permission to change others).
For parking slots, trunks and queue waiting calls you can pick the calls up. (needs the pickup permission)
For queue member icons you can choose to remove them or pause/unpause them (it requires the queuemanager permission)
For conferences you can perform global actions or individual actions, like mute/unmute, lock/unlock, kick, etc. (it requires the meetme permission)
Visual Phonebook
At the top left of the main panel window, there is a phonebook icon. When clicked you will be presented with a phonebook application where you can add, edit or delete entries.
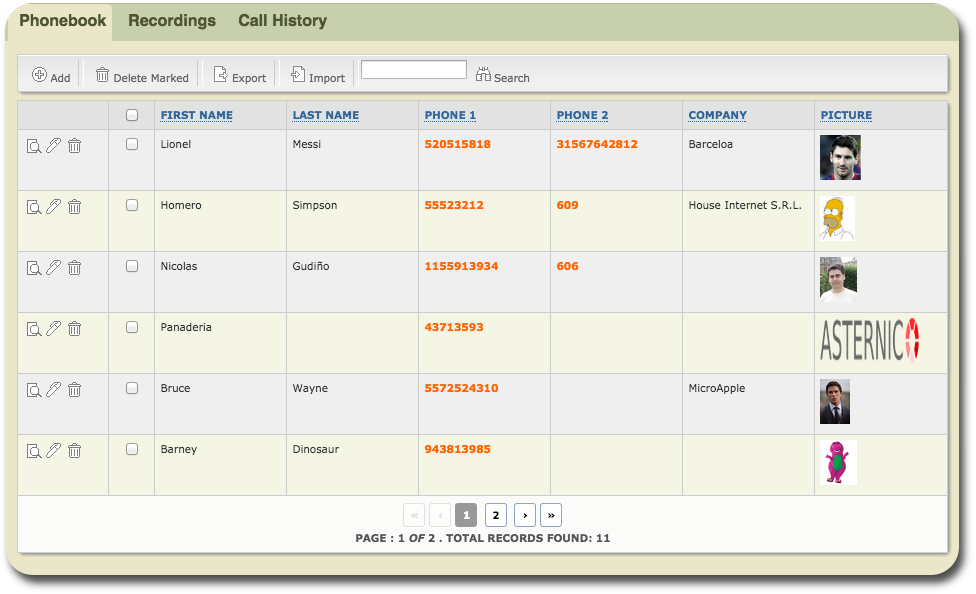
Usage is straightforward. You can click the Add button to insert new records, or click the action buttons for each record to view, edit or delete them. There is a search box that lets you search for any string or number. And an Export button that lets you export to CSV your phonebook.
Phonebook entries will be searched in realtime when you type something on the Dial box, so it can be used as a company directory. It will also be searched when an inbound call is received. If the caller id matches one of the entries, it will use the name and picture of the contact for a call notification that will popup at the lower right hand of FOP2 screen as depicted here:
Importing Data
Since FOP2 version 2.10 you can import CSV data to the phonebook by clicking the Import icon. When clicked it will show you an extra field where you can type/search the csv file name to import. The first line on the CSV file must contain the field names, and the following lines the records you want to insert. This is a sample file:
sample.csv
firstname,lastname,company,phone1,phone2,private
Nacho,Rodriguez,Telecorp,123900001,125900002,no
John,Doe,Simcorp,55555555,,606,no
Most fields are self explanatory, like firstname, lastname, etc.
The private field lets you mark a record as private or not (private records can only be edited and viewed by its owner).